You have had your initial consultation, you have decided which types of braces suit you, and your teeth have been mapped and molded. So what is next? Your orthodontist puts them on.
Orthodontic technology has made remarkable strides in offering numerous styles and types of braces. Yet, traditional braces continue to remain the most frequently used type of braces. Here’s what you’ll need to know about how they are fitted.
Step 1: Take a Deep Breath and Relax
This won’t hurt a bit. The application process itself is pain and discomfort free. We recommend, however, that you don’t touch your braces once they are fitted, as you are most likely to experience some discomfort if you do. The process of having your braces applied is a not a particularly long one, but bringing some of your favorite music in to help you pass the time is not a bad idea.
Step 2: Say Ah!
Now that you are in the chair and relaxed, your orthodontist will fit a cheek retractor in place to make your pearly whites easier to get to as well as keep them dry. In many cases you will have a bite blocker put in place, too, to stop your tongue from wetting your teeth.
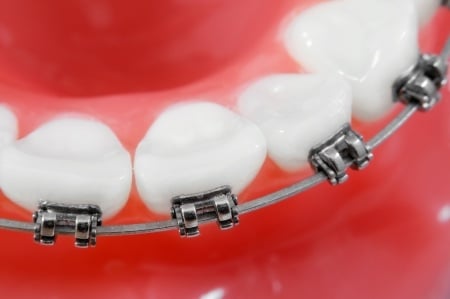
You will then be fitted for bands (called molar bands) around your back teeth. In some instances, these bands are used on other teeth, too, and the bracket is attached to those bands.
You may have had separators (commonly known as spacers) applied previously to help make this step a little easier.
Step 3: Polishing and Conditioning
Your orthodontist will give each of your teeth a good polishing to ensure that the surface is prepared for the best possible bond with the brackets. After they air dry, a conditioner is applied to the front of your teeth to further help prepare for the bonding process. It doesn’t stay on for long (about 30 seconds) after which the teeth are cleaned and dried again. An adhesive primer (another bonding agent) goes on as the final step before the adhesive cement (or the glue) comes into contact with the tooth.
Step 4: You’re Stuck With Them
Now it’s time for the brackets (the little “hooks” that attach to the archwire) to go in, or rather on, your teeth. Cement is put on the back of each individual bracket and is placed on the corresponding tooth. In some cases—like at Orthodontic Associates—the bonding cement comes pre-applied to the brackets to save time and potential mess.
Once it is positioned in the right spot, the excess is cleaned off and a high-intensity curing light is used to harden the glue, locking the bracket in place.
Step 5: Getting Wired
You’re almost done at this point. Your orthodontist will carefully thread the archwire into the bands and then align them into the freshly attached brackets, removing any excess wire so that you will not get poked.
The archwire is held in place by using rubber bands (or sometimes wires) called ligatures. If you don’t have self-ligating braces (or wires), the rubber bands come in a variety of colors, which can help you create your own “look.”
The process normally only takes about 30 minutes and you’re on your way to that perfect smile!
At Orthodontic Associates we offer a range of braces to all of our patients, choosing each one carefully to match particular orthodontic needs as well as budget. Choose from any of our nine convenient locations around Baltimore and make an appointment to see how we can best help you. As always, we look forward to making you smile!